Craving that perfect panini experience—crispy, golden-brown bread giving way to a warm, gooey, cheesy interior and savory fillings? Imagine enjoying this cafe-worthy delight right in your own kitchen, any night of the week, without crowding your countertops with another bulky appliance. For the longest time, the idea of making authentic panini at home seemed out of reach without a dedicated press. But what if we told you the secret to a fantastic, easy homemade panini without a panini press is likely already hiding in your kitchen cupboards?
Indeed, you don't need fancy gadgets to achieve panini perfection. All it takes is a simple skillet and a clever "weight hack" to transform ordinary ingredients into an extraordinary hot sandwich. This appliance-free method is not only quick and easy but often less hassle to clean up, making it an ideal solution for busy weeknights. Get ready to discover how to make delicious, restaurant-quality panini that are crunchy on the outside, warm and gooey on the inside, all with minimal fuss and maximum flavor.
Why Go Appliance-Free? The Benefits of the Skillet Panini
The allure of a panini press is understandable – it promises those distinctive grill marks and even compression. However, the reality for many home cooks is often different: limited counter space, budget constraints, or simply not wanting another single-purpose appliance gathering dust. This is where the skillet and weight method shines, offering a multitude of benefits that make it a superior choice for many:
- No Special Equipment Needed: The most obvious advantage is that you can ditch the expensive press. Most kitchens already possess a sturdy skillet and a heavy, heat-safe object, meaning you can whip up a panini anytime the craving strikes, without an extra investment.
- Quick and Easy Cleanup: Compared to intricate panini presses with their nooks and crannies, a cast-iron skillet is remarkably easy to clean. A quick wipe-down and wash, and you're done, saving you precious time on busy evenings.
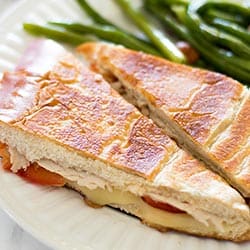
- Just as Delicious Results: While you might not get the iconic grill marks, the skillet method delivers the fundamental elements of a great panini: a beautifully toasted, crunchy exterior and a perfectly melted, warm interior. The flavor and texture are every bit as satisfying.
- Versatility at Its Best: Your skillet isn't just for panini; it's a multi-tasking workhorse in the kitchen. This method integrates seamlessly into your existing cooking routine, proving that often, the best tools are the ones you already have.
- Ideal for Weeknights: Taking just 10-15 minutes from start to finish, this quick weeknight panini technique is a game-changer. Pair it with a simple side, and you have a satisfying, comforting meal that feels special without demanding extra effort.
Embracing the appliance-free approach means unlocking a world of hot sandwich possibilities, proving that culinary ingenuity can often trump specialized equipment.
Unlocking the Secret: The Skillet & Weight Method Revealed
The "secret" to making perfectly crispy, gooey panini without a press lies in combining consistent heat with even pressure. This can be easily achieved with a few common kitchen items. Our Test Kitchen has refined this technique, and we're excited to share it with you.
Essential Tools You'll Need:
- Two Skillets (Ideally Cast Iron): Cast iron is fantastic for retaining and distributing heat evenly, crucial for that golden crust. If possible, use one skillet that's slightly smaller than the other so it can nest comfortably on top of your sandwich. If you only have one, no problem – a heavy weight directly on the sandwich (with parchment paper) will also work.
- A Heavy, Heat-Safe Object: This is your "press." Ideas include:
- A tea kettle filled with water
- A heavy saucepan or pot filled with water or canned goods
- Another cast-iron skillet
- A brick wrapped securely in aluminum foil
- Heavy cookbooks (placed on top of a heat-safe object, not directly on the hot skillet)
- Spatula or Tongs: For carefully flipping your panini.
- Basting Brush or Paper Towel: For applying oil to the skillets.
Choosing Your Ingredients for Panini Perfection:
While the method is flexible, certain ingredients lend themselves particularly well to the panini treatment:
- Bread: Opt for hearty, sturdy breads that can withstand pressure and become beautifully crisp. Great choices include ciabatta, French bread, thick-sliced sourdough, focaccia, or even artisanal country bread. Avoid very soft or delicate breads that might flatten too much or become soggy.
- Fillings:
- Melty Cheese: This is non-negotiable for that signature gooey center! Provolone, mozzarella, Swiss, cheddar, Monterey Jack, fontina, or Gruyère are all excellent.
- Proteins: Thinly sliced deli meats like turkey, ham, roast beef, or pre-cooked chicken breast work wonderfully. Cooked bacon strips are also a delicious addition.
- Veggies: Thinly sliced tomatoes, spinach, roasted red peppers, caramelized onions, or sautéed mushrooms add flavor and texture. Avoid overly watery vegetables.
- Spreads: Elevate your panini with a flavorful spread. Tangy garlic aioli, pesto, Dijon mustard, sun-dried tomato spread, or a simple flavored butter (like garlic-herb) brushed on the exterior bread can make a huge difference.
- Important Tip: Don't overfill! A panini is best when the ingredients are evenly distributed and not bursting out the sides. A thin layer of fillings allows for better compression and melting.
Step-by-Step Guide to Your Appliance-Free Panini:
Ready to create some magic? Follow these simple steps for a perfect skillet panini:
- Preheat Your Skillets: Place your larger cast-iron skillet (and the smaller one, if using for pressing) over medium-high heat. Allow them to heat thoroughly for 5-7 minutes. This even heat is key for a golden crust.
- Assemble Your Panini: While the skillets heat, construct your sandwich. Spread your chosen sauces on the bread slices, layer with cheese, protein, and any other fillings. Remember, less is often more.
- Prepare for Pressing: Carefully add a small amount of olive oil or melted butter to the larger, preheated skillet. You can use a paper towel to evenly spread it. If using a second skillet as a press, lightly oil its bottom surface as well (be extremely careful, it will be hot!). Alternatively, you can brush the exterior of your sandwich bread with oil or melted butter for extra crispiness.
- Place and Press: Gently place your assembled sandwich into the oiled skillet. Immediately position the second, smaller skillet on top of the sandwich.
- Apply the Weight: Place your chosen heavy, heat-safe object (e.g., a filled tea kettle) on top of the second skillet. This applies even pressure, helping to compact the sandwich and create that desirable crispy crust and gooey interior.
- Cook and Flip: Let the panini cook for about 3-5 minutes on the first side, or until it's beautifully golden brown and toasted. Carefully remove the weight and the top skillet, then use a spatula or tongs to flip the panini. Reapply the top skillet and weight, and cook for another 3-5 minutes on the second side, or until golden brown, the cheese is thoroughly melted, and the fillings are warm.
- Serve and Enjoy: Once your panini is perfectly toasted, carefully remove it from the skillet. Transfer it to a cutting board, slice in half (often diagonally for a classic look), and serve immediately.
For more detailed insights on mastering this technique, check out Easy Homemade Panini Without a Press: Skillet Secrets Revealed.
Beyond the Basic: Tips for Next-Level Skillet Panini
Once you've mastered the basic skillet and weight method, you can start experimenting to elevate your panini game. Here are some pro tips and variations to take your hot sandwiches to the next level:
Flavor Enhancers & Creative Variations:
- Compound Butters: Instead of plain oil or butter, try brushing the exterior of your bread with a flavorful compound butter. Garlic-herb, chili-lime, or sun-dried tomato butter can add an incredible depth of flavor as the bread toasts.
- Pickled Accents: A few thin slices of pickled red onion or jalapeños can add a fantastic tangy crunch that cuts through the richness of the cheese and meat.
- Sweet Panini: Don't limit yourself to savory! Try a dessert panini with Nutella, sliced bananas, mascarpone cheese, or even cooked apple slices with a sprinkle of cinnamon.
- Layered Flavor: Think about textures and complementary flavors. A layer of thinly sliced pear with brie and prosciutto, or roasted chicken with pesto and provolone, offers a sophisticated touch.
- Marinate Your Meats: If using plain chicken or tofu, marinating it briefly before adding to the panini can infuse it with extra flavor.
Troubleshooting Common Panini Puzzles:
- Too Soggy?
- Ensure your bread is sturdy enough.
- Don't use overly wet ingredients; drain tomatoes or pat spinach dry.
- Don't overfill the sandwich.
- Ensure your skillet is hot enough from the start to quickly toast the bread.
- Not Melty Enough?
- Make sure your skillet is sufficiently preheated.
- Cook slightly longer, ensuring the heat has time to penetrate.
- Use cheeses known for good meltability.
- Ensure your fillings are at room temperature, not straight from the fridge.
- Burns Too Fast?
- Your heat might be too high. Reduce it to medium.
- Use a medium-thick bread that can handle the heat.
- Keep a close eye on it; every stove and skillet is different.
Serving Suggestions:
A great panini is often the star, but it loves good company. Classic pairings include a steaming bowl of tomato soup, a fresh green salad with a light vinaigrette, or simply a side of crunchy potato chips and pickles. For a more substantial meal, consider some roasted sweet potato fries or a quick coleslaw.
To explore more creative combinations and perfect your skillet panini game, read Get Crunchy, Gooey Panini Sans Press: Simple Skillet Method.
The Skillet Panini: A Game-Changer for Busy Kitchens
The beauty of the appliance-free skillet panini method is its sheer practicality. It's a testament to the idea that delicious, satisfying meals don't require an arsenal of specialized equipment. This simple hack empowers you to transform everyday ingredients into a gourmet-style hot sandwich, bringing the cafe experience home with remarkable ease.
For anyone seeking quick weeknight meals that don't compromise on flavor or comfort, the skillet panini is an absolute game-changer. It streamlines meal preparation, minimizes cleanup, and opens up a world of culinary creativity, all while utilizing the trusty tools you already own. Say goodbye to the need for a panini press and hello to endless possibilities for delicious, perfectly toasted sandwiches.
So, the next time you're craving a panini, skip the specialty appliance and reach for your trusty skillet. With our easy homemade panini without a panini press method, you'll be enjoying crunchy, gooey, and absolutely delicious hot sandwiches in no time. It's quick, it's easy, and it's proof that sometimes, the simplest solutions are the most brilliant. Happy pressing!
